Learn Git Part 1
Published on Jun 06 , 2025 by SuryaPrakash.
Introduction
So, you’ve decided to finally learn Git . Either because you want to stop blindly copy-pasting commands from Stack Overflow, or because you’ve just been publicly shamed by git status. Don’t worry, we’ve all been there.
Git might seem like some black magic tool that exists just to ruin your day with merge conflicts. But it’s actually… well, yeah, okay — it can still ruin your day. But once you get the basics right, it becomes a lot less scary (and a lot more useful but you will still have merge conflicts).
Let’s break it down, nice and easy — no jargon and minimal emotional damage.
What is git?
Git is a “simple and easy-to-use” version control system — and by “simple,” I of course mean “it will occasionally give you impostor syndrome.” But seriously, Git helps you track changes across your codebase, revert them when things inevitably go south, and generally helps you maintain larger codebases with ease.
Sure, you could argue that Git is for the weak — that real developers don’t need version control because they never make mistakes. But when you're knee-deep in a massive project or juggling contributions from a dozen teammates who all swear their code works “on their machine,” Git suddenly starts looking like the unsung hero you never knew you needed.
How to use git?
Alright, let’s keep things simple. We’ll assume you already know how to use the command line and navigate to your project folder using the terminal. If that sounds like you, great — you're all set.
Now, let’s walk through the steps below.
Please install
gitbefore continuing this article 😅
Initializing a git repository
Lets first create a new empty directory Hello-World where we will create a mock project to learn git. Lets create the directory and use that directory by using the following command.
mkdir Hello-World && cd Hello-World
To first start working with git we need to initialize a new git repository. Repository refers to directory created by git that will track all the versions of your code.Run the command into command in the Hello-World directory.
git init
Now whatever the changes that are made in the Hello-World directory git will track them (technically).
Lets create our first file
We can create a file inside the Hello-World directory with:
echo "line 1" >> README.md
Now you might think Git starts tracking README.md immediately — but not quite.
To check the status of our repository, run:
git status
You’ll see something like this:
On branch main
Changes not staged for commit:
  (use "git add <file>..." to update what will be committed)
  (use "git restore <file>..." to discard changes in working directory)
        modified:   README.md

no changes added to commit (use "git add" and/or "git commit -a")
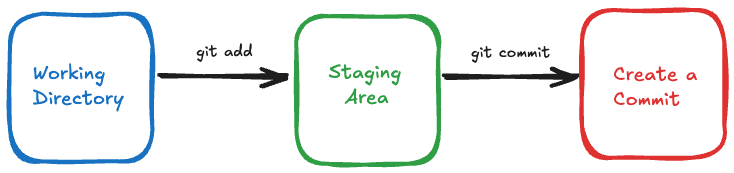
Why isn’t Git tracking the file yet?
By default, Git doesn’t track every file in the working directory. It only tracks files that have been added to the staging area.
Think of the staging area as a waiting room. Files go there before Git includes them in a commit.
To move a file to the staging area, use:
git add <file_name>
So in our case:
git add README.md
Alternatively, to stage all changes in the current directory:
git add .
Once a file is staged, Git will track it and include it in the next commit. Now lets see the status of our repository by using the following command.
git status
You will see something like this. Git tells us that Readme.md is a new file . But git won't save these changes yet.
On branch main

No commits yet

Changes to be committed:
  (use "git rm --cached <file>..." to unstage)
        new file:   Readme.md
Creating our first commit.
Think of a commit as a save point in your codebase — like a snapshot of your project's current state. Once you create a commit, you can always go back to it. Pretty cool, right? Break your code with a segfault? No problem — just rewind to a working state.
To create a commit, use:
git commit -m "my first commit"
Here, the -m flag is for the commit message — a short description that helps you (and others) understand what this snapshot is about.
Important: Git only commits files in the staging area. So always use
git addto stage your changes before committing!
To check if your commit was successful, run:
git status
You should see something like:
On branch main
nothing to commit, working tree clean
This means everything is up to date — no pending changes. You're good to go!
Checking our logs
You can view your commits using the git log command. This shows a history of all commits in your repository.
git log
If you’ve been following along, you’ll see something like this:
commit 9971e6ab1c3c85b53b165b9e62a46408c075361f (HEAD -> main)
Author: Surya Prakash <example@example.com>
Date:   Fri Jun 6 09:15:25 2025 +0530

    my first commit
(END)
Breaking it down:
- commit: This long string is the unique hash ID of your commit — like a fingerprint. You can use this to refer to this exact version of your code.
- Author: Who made the commit.
- Date: When the commit was made.
- Message: The description you gave using the
-mflag. - main: This tells you the commit is on the
mainbranch (we’ll talk about branches later).
It might feel like a lot at first — so here’s a quick summary:
Ok about the summary part, make changes to your project , add those changes to the staging area by using git add, create a commit using git commit.
Pushing our code to remote
After creating a commit, the next step is to push your code to a remote repository.
What is a Remote Repository?
A remote repository is just a Git repository hosted on a server — like GitHub, GitLab, or Bitbucket. It allows you to store your code online and collaborate with others.
Why push code to a remote server?
There are several advantages:
- Team collaboration: Your teammates can work on the same project. They make changes, commit, and push their code. You can then pull those changes into your local project.
- Backup: Even if your laptop burns (please don’t test this!), your code is still safe in the remote repo.
Popular Git Hosting Platforms:
Getting the Remote URL (GitHub Example)
For this guide, I will use GitHub.
- Create an account on GitHub.
- Create a new repository (you can skip adding README/License for now).
- Once the repo is created, you’ll see a screen like this:
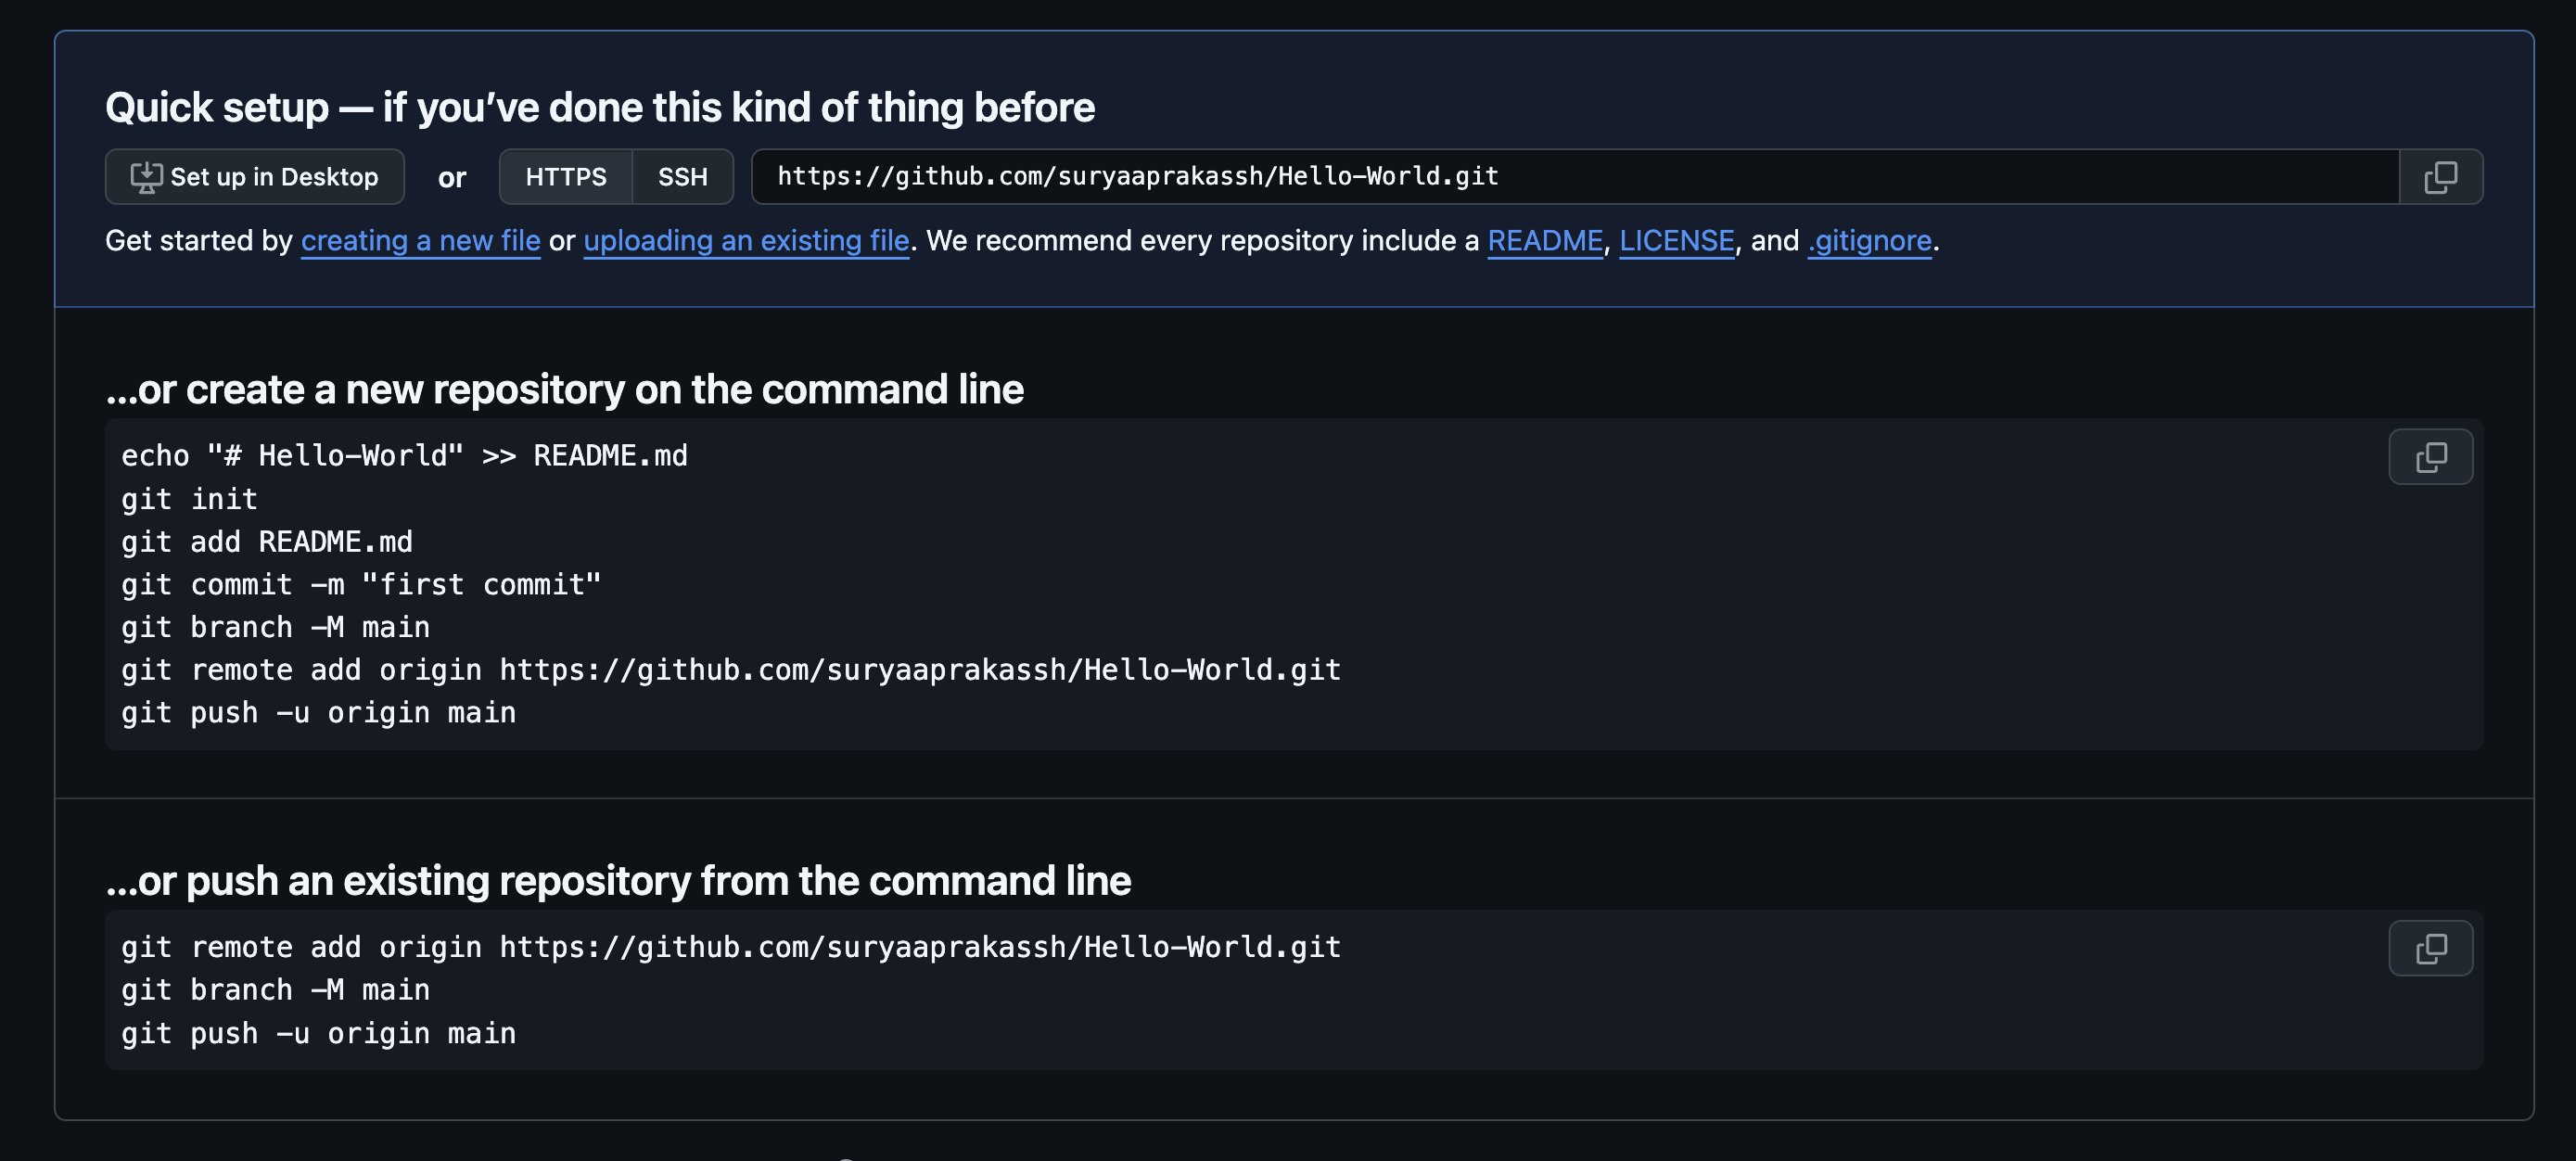
From here, copy the HTTPS URL of the repository — it looks like this:
https://github.com/your-username/your-repo-name.git
We’ll use this URL to link your local repo to the remote one. Let’s do that next!
Linking your repo to a remote url
Lets use the following command to link our repository with a remote url.
git remote add origin https://github.com/your-username/your-repo-name.git
Don't forget to change the remote url before executing this command
In the above command origin refers to the name of the remote. You can name it however you like. But origin is the convention.
Pushing our code to the remote
At last!! final steps .To push our code to the remote we use the following command.
git push origin main
Here origin refers to the name of the remote url that we created in the previous step. And main refers to the branch which we want to push. This will push our commit to the remote repository.
TLDR; only the commit which we created will be pushed and if the changes are not committed it will not be reflected in the remote repository.
Wrapping up!
Ok we successfully created our git repository and pushed it to a remote sever. I dont wanna drag more, look for the upcoming parts where we will create branches and work with merge conflicts thats a whole another story. If there are any mistakes in this article or you have some suggestion feel free to drop a mail.